Table of Contents
General Tab

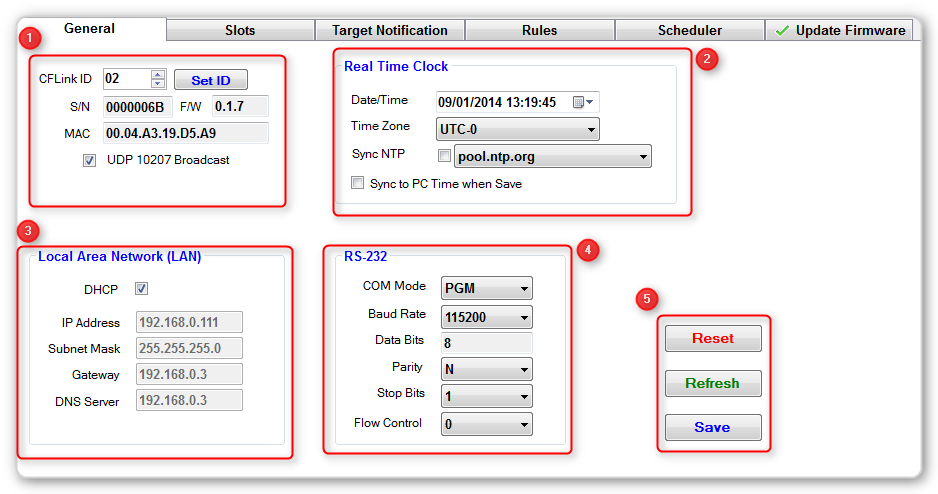
The general tab allows you to configure the following information.
1 - Device Info
Change the CFLink ID of the device by using the up and down arrows or by entering a number. The CFLink ID must be between 2 and 238. This number must also be unique on the CFLink network, if there is a CFLink conflict the LAN bridge will automatically assign the device a different ID.
In this tab you can also view the devices serial number, firmware version and MAC address.
To turn off UDP broadcasting, un-tick the box labelled UDP 10207 Broadcast.
2 - Real Time Clock
Change the real time clock settings here.
Set the time manually, or tick the Sync NTP box and choose a server for the device to sync its time to.
Sync to PC time when save will change the clock settings to match your PC settings when you next click the Save button.
3 - Local Area Network (LAN)
Configure your LAN settings here. If DHCP is clocked on, then the device will get all the LAN settings from the DHCP server and you will not be able to change any of the settings manually.
4 - RS232
Change the settings for the in built RS232 port.
Under COM Mode , be sure to set the either Program (PGM) or 232 mode. Program mode will allow the device to be detected and programmed via RS232, 232 will allow the LAN Bridge to control third party devices via the RS232 port.
If you are having problems connecting to the device in Program mode, be sure that the Baud Rate is set to 115200.
All other settings are set as per a standard RS232 connection and should be changed if required to communicate to your desired device.
5 - Buttons
The Reset button will reset the device, it is essentially the same as removing the power for a short amount of time.
The Refresh button will request the settings from the device and display them in System Commander. You will lose any unsaved settings when you click this button.
The Save Button will save any settings you have entered in System Commander to the device.