Table of Contents
Images
Images are used to render a variety of image formats at specific coordinates in the user interface created with our guiDesigner software. Images can be either Static or Dynamic. The path of the image defines whether the image will be dynamic or static.
Image Formats
The following image formats are supported:
- PNG (with alpha transparency - recommended format for all images)
- JPEG
- GIF (non-animated)
- BMP
Static
Static images are defined at design time and always remain the same. The path of a static image is based on the Asset Folder setting in Project Properties.
Dynamic
There are two types of dynamic images supported:
- Images served from any web server via the HTTP protocol
- Images loaded from cache (any image used elsewhere in the project)
Any image path starting with http:// will be dynamically loaded when the image comes into view (either on a Page or Subpage).
The image path can also be changed on the fly by assigning the image a Serial Join and changing the joins value to point to a new HTTP URL or to any image used within the project.
One trick commonly used is to create a Cache Page and place any images you want to use dynamically later on within this page.
Then you can change the serial join of any image in your GUI to point to any of these cached images.
For example, if you place an image “weather_01.png” on a Cache Page, you can refer to it on any of your other pages by changing an images serial join to the value 'weather_01.png'.
Refreshing Dynamic Images
To automatically refresh an image, you can set the Refresh Rate of the Image properties.
This is a value in milliseconds at which the image will constantly refresh whilst the image is in view.
Otherwise, whenever the serial join is updated to a new (or existing) value, the image will refresh.
This way you can force a refresh at any time you need. Sending the same serial value as is already associated with the serial join will still cause it to refresh.
How to use Images in your Project
To implement an image in guiDesigner:
- Select the image icon
 on the tool bar.
 - Then draw a box roughly the size of the image you wish to use. This size can be edited later on.
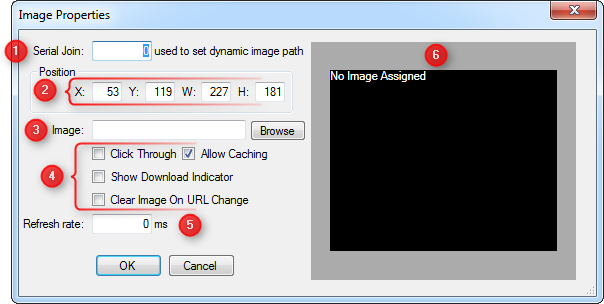
- The Image properties window will then open up. Configure these options as required and as per the following details.
Image Properties

1 - Serial Join
Assign a join value more than 0 to enable dynamic image path.
2 - Position
This option allows for manual entry of the position and size of the image.
- X Position (left of image)
- Y Position (top of image)
- Width of the image
- Height of the image
3 - Image
Browse to the directory or path where the default image is stored and to be selected.
4 - Check Boxes
- Click Through - Allows clicks through the image to the objects below.
- Allow Caching - Allows the image to be cached so that it'll load faster.
- Show Download Indicator - Show the progress and indication of the status of the image download and loading.
- Clear Image on URL Change - Will clear the image on any changes in the dynamic image path.
5 - Refresh Rate
The rate (in milliseconds) the image will constantly refresh whilst the image is in view.
6 - Image Preview Window
A preview of what the image will look like.
Hints and Tips
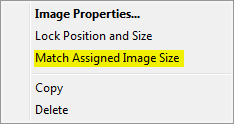
When you choose the image in Image Properties, if the image resolution is a different size to the image box you created originally then the image perspective will be distorted. You can fix this by right clicking on the image and clicking Match Assigned Image Size.
