Table of Contents
Quick Start Guide Page 2 - System Commander
A video version of this quick start guide is available here.
Updating Firmware
When you first get your CommandFusion hardware, the first thing you should do is check to see if your devices have the latest firmware installed.
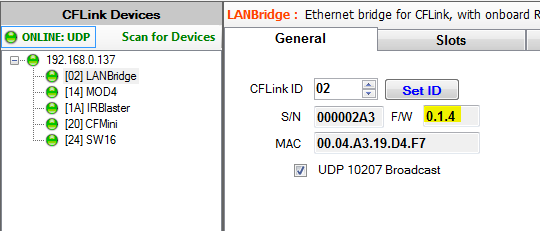
We can check the firmware version of our device by selecting it in the device tree. Under the general tab, we can see the basic details of our hardware. CFLink ID, Serial Number, Firmware version and Mac Address if applicable.
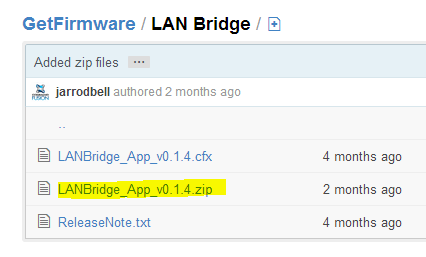
 So take note of the firmware version listed, then go to firmware.commandfusion.com and select the appropriate device. This will take you to another page which lists the current firmware number. If this number is larger to that on your hardware, then its time to update it.

To download the firmware, click on .ZIP file, then click RAW. The firmware will then download to your computer. You will then need to unzip it before it can be used.
 We will assume for this video that our hardware has all the latest firmware installed. For more details on how to update firmware, see our Firmware Updating page.
Click here to see this section in a video guide.
Automatic ID Conflict Resolution
CommandFusion hardware communicates with each other over a peer-to-peer bus called CFLink. This bus requires each device to have a unique ID for communications - this ID is called the CFLink ID. From the factory, devices of the same model all come set to the same CFLink ID.
Unlike other control systems, during auto discovery System Commander will report any ID conflicts on the CFLink network and handle assigning unique ID’s to all conflicting devices.
The end result is no more conflicts and a healthier CFLink network without having to manually connect individual devices to assign their ID.
Click here to see this section in a video guide.
Basic Configuration of Device Properties
After devices have been discovered, you can click on them in the CFLink Devices tree to bring up their configuration options.
Each CFLink device has a few general settings that can be configured or viewed. Settings common to all CFLink devices are the CFLink ID, serial number and firmware version.
Devices with an on-board serial port will allow you to setup the communication settings for the RS232 serial port.
The LAN Bridge will also show options specific to the Ethernet connectivity, such as the MAC address and standard LAN settings. The LAN Bridge also features a real time clock which can synchronise with a time server or be manually configured.
After making any changes to the configuration, use the ‘Save’ button to save the new configuration to the device memory.
The reset button will force the device to reboot, whilst the refresh button will request the configuration properties from the device and update System Commander with the current details.

Click here to see this section in a video guide.
Port Testing
Devices with control ports such as relays, I/O, IR or serial ports can be tested using the System Commander interface.
Simply select the device from the CFLink Devices tree and choose the tab that relates to the port you want to test.
For example, the CF Mini has 4 relays ports we can test. There are options to test all aspects of the CFLink protocol for relays, including basic open/close commands, as well as toggle and pulse commands. The interface will also show the live state of each relay with an indicator graphic that turns on when the relay is closed.
 For IR ports, you can choose the port and format of IR data to test, including the on-board database which has a wizard built in to find the right command. Pressing the send button will send the IR data, allowing you to easily test IR commands.

For IO ports, we can see their current input or output state, as well as trigger their output state when the port is configured in one of the output modes.

Click here to see this section in a video guide.
Page 3
This quick start guide is broken up into multiple pages.
<<Go back to page 1 | Go Forward to Page 3>>