User Tools
Sidebar
Navigation
software:system-commander:quick-start-guide:quick-start-page-3
Table of Contents
Quick Start Guide Page 3 - System Commander
A video version of this quick start guide is available here.
Basic Rules
Each CFLink device has an on-board microprocessor capable of performing rule based macro triggering, creating a network of distributed intelligence. Rules allow each device to respond to events and trigger macros to run across the CFLink bus. So as an example, an event like a dry contact closing can trigger a relay to close and send a specific IR command.
It’s important to note that the rules should be configured on the device that will be directly receiving the event data. For example, if the event that will be used to trigger a macro is a dry contact input on a CF Mini, then the rule should be configured on the CF Mini.
If the event was a specific incoming string from an RS232 port, then the rule should be configured on the device with the RS232 port being used to receive the data.
To create rules, we first setup the macros that will be triggered by adding them to the device that will receive the events. In this example we will be creating a macro to lower a projector screen, turn on a projector and turn on a bluray player.
So, we select the CF Mini in the devices tree, then click on the Rules tab.
Then we click Add Macro
We will call this macro ‘System Start Bluray’. Then press OK

Now we need to add each action in order that we want them to be performed. First we want to turn on the projector because this can take a while to warm up. The projector is controlled via the on-board RS232 port of the LAN Bridge, click on Add Action and then click on Action Builder and select the action type On-Board COM.

The target device list will then automatically fill with any CFLink device on our network with an on-board RS232 port. Select the LAN Bridge then fill out the RS232 command that needs to be sent to power up the projector.
 Press
Press OK and notice the CFLink command is automatically built for you.
 Now we can press
 OK and continue adding the next action for the macro.
The next action is to lower the projector screen. This is done using a relay connected to a CF Mini.
Click on Add Action, then Action Builder. Choose Relay as the action type, and make sure the target device is the CF Mini you are programming your macro on.
The relay ports will automatically populate based on the ports available on the target device. In our case we want to pulse relay 3 for 1 second.

Press OK and again the CFLink command is automatically generated for you. We want this command to happen without any delay so leave the delay set to 0.
Lastly we want to fire an IR command to turn on the Bluray player. Once again, add an action and go into the Action Builder. We will use the CF Mini on-board IR database and the action builder to automatically create the IR command to send.
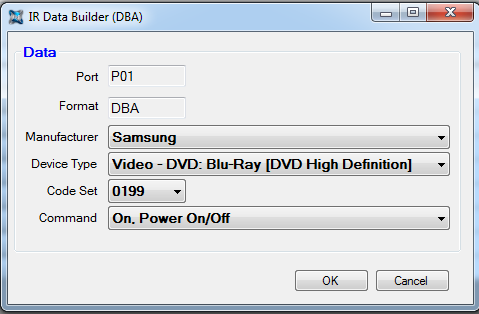
Select IR action type, choose the device we want to send the IR from - in our case IR port 1 of a CF Mini. Choose DBA format and press the ‘Build…’ button to bring up the IR database wizard.

Enter the device details - Samsung, Bluray player, try codeset 0199 and choose the discreet power on command (rather than power toggle).
 Press
Press OK to automatically generate the CFLink command. We can then enter a delay if we wanted, which would add a pause between the projector screen down command and the bluray power on command. But in this case we don’t need to delay the IR command, so just press OK to finish adding the last action to the macro.

Now we need to add the rule which will cause this macro to be started. In our case, we want this system startup macro to be triggered whenever a button on a wall switch is pressed, which is hooked up to an I/O port of the CF Mini, configured as a dry contact input.
When the wall switch is pressed, we can use the communication log to see the incoming CFLink data format that we need to use to trigger our macro. To clear the log, right click on it and select Clear Log then find the command of the wall switch being pressed. Right click and copy the CFLink command.

Now add the rule by pressing the Add Rule button. Give the rule a name relating to the input event and paste the command you just copied into the Search String Field. Then select the macro we want to fire and press OK.
 Before the rule will become active, we need to save it to the device memory. Press the
 Save to Device button to begin this process. A progress bar will popup just above the log area to show the save progress. After this is done, you can use the Load from Device button to double check that the data was saved to device correctly.
Click here to see this section in a video guide.
Page 4
This quick start guide is broken up into multiple pages.
<<Go back to page 2 | Go Forward to Page 4>>
software/system-commander/quick-start-guide/quick-start-page-3.txt · Last modified: 2013/01/09 04:55 by aaron
